
Salesforce
Integrating Salesforce with your BotDojo account enables you to leverage Salesforce's powerful CRM capabilities within your BotDojo workflows.
Introduction
Integrating Salesforce with your BotDojo account enables you to leverage Salesforce's powerful CRM capabilities within your BotDojo workflows.
This guide provides a step-by-step walkthrough to connect Salesforce with your BotDojo account through OAuth integration, ensuring a seamless setup process. Follow each step carefully to ensure successful integration.
Prerequisites
Before you begin, ensure you have the following:
- Salesforce Account: Admin access to your Salesforce organization.
- BotDojo Account: Access to your BotDojo account.
- HTTPS Callback URL: You'll need this from your BotDojo application (provided below).
Creating a Connected App in Salesforce
Follow these steps to create a Connected App in Salesforce that will allow BotDojo to connect securely.
Step 1: Initial Navigation
- Access Setup
- Log in to your Salesforce account.
- Click on the gear icon in the top-right corner.
- A dropdown will appear, click on Setup from it
Documentation screenshot
- Create New Connected App
-
On the Setup screen in the left-side panel, under Platform Tools, click on Apps.
Documentation screenshot -
An expanded list will appear, select App Manager from that list. Then, in the App Manager screen, click on the New Connected App button in the top-right corner.
-
On the Setup screen in the left-side panel, under Platform Tools, click on Apps.
Step 2: Choose App Type
- When prompted, select Create a Connected App from the dialog box and click Continue.
Step 3: Set up New Connected App
- Enter Setup Information
- Connected App Name: Enter a meaningful name (e.g., "BotDojo Integration").
- API Name: This will auto-generate based on your app name, but you can modify it if needed.
- Contact Email: Enter your email address or your support team's email.
- Contact Phone (optional): Enter a contact phone number.
- Logo Image URL (optional): Must use HTTPS if provided.
- Description (optional): Describe the purpose of this integration.
Step 4: Configure OAuth Settings
- Enable OAuth Settings
- In the API section, check the Enable OAuth Settings box.
- Enter your Callback URL: Use
https://app.botdojo.com/integrations/salesforce/oauth_redirect. - Select the following OAuth scopes:
- Full access (full)
- Perform requests at any time (refresh_token, offline_access)
- Manage user data via APIs (api)
- Uncheck Require Proof Key for Code Exchange (PKCE) Extension for Supported Authorization Flows
- Check Require Secret for Web Server Flow
- Check Require Secret for Refresh Token Flow
- Check Enable Client Credentials Flow
- Read and acknowledge the security warning that appears.
- This setting is crucial as it allows for server-to-server integration without user interaction.
- Click Save to apply these settings.
Step 5: Select Execution User
-
Configure Run As User
- After saving, click Manage on the connected app.
Documentation screenshot - Click Edit Policies.
Documentation screenshot - Under Client Credentials Flow, use the lookup icon to select a Run As user.
Documentation screenshot - Select a user. For Enterprise Edition, it's recommended to select a user with "API Only User" permission.
- The selected user's permissions will determine what the connected app can access in Salesforce.
Documentation screenshot - Once you've selected your user, click Save.
Step 6: Access Consumer Key and Secret
-
Retrieve Authentication Credentials
- In the left-side panel, under Platform Tools, click on Apps.
- An expanded list will appear, select App Manager from that list.
- Find the app you just created.
- On the right, click the dropdown and select View.
Documentation screenshot - On the next page, click on Manage Consumer Details button under API settings.
Documentation screenshot - Now you'll be able to view the Consumer Key and Consumer Secret is only shown once when first created, so be sure to copy it.
- Store these credentials securely as they will be used for authentication with BotDojo.
- If needed, you can rotate these credentials later using the "Rotate Consumer Key and Secret" option.
Documentation screenshot
Step 7: Get Your Salesforce Domain
-
Get Your Salesforce Domain
- Click on your avatar in the top-right corner of your Salesforce account.
- Copy the subdomain portion right below your username (everything before
.my.salesforce.com).
For example:
- Full URL:
botdojo-dev-ed.develop.my.salesforce.com - Subdomain to copy:
botdojo-dev-ed.develop
Documentation screenshot Note: You'll need this subdomain when connecting Salesforce to BotDojo.
Connecting Salesforce to Your BotDojo Account
Now that you have your Salesforce Connected App credentials, you can connect Salesforce to your BotDojo account.
Step 1: Access Salesforce Integration in BotDojo
-
Log in to BotDojo
- Go to your BotDojo account dashboard.
-
Navigate to Integrations
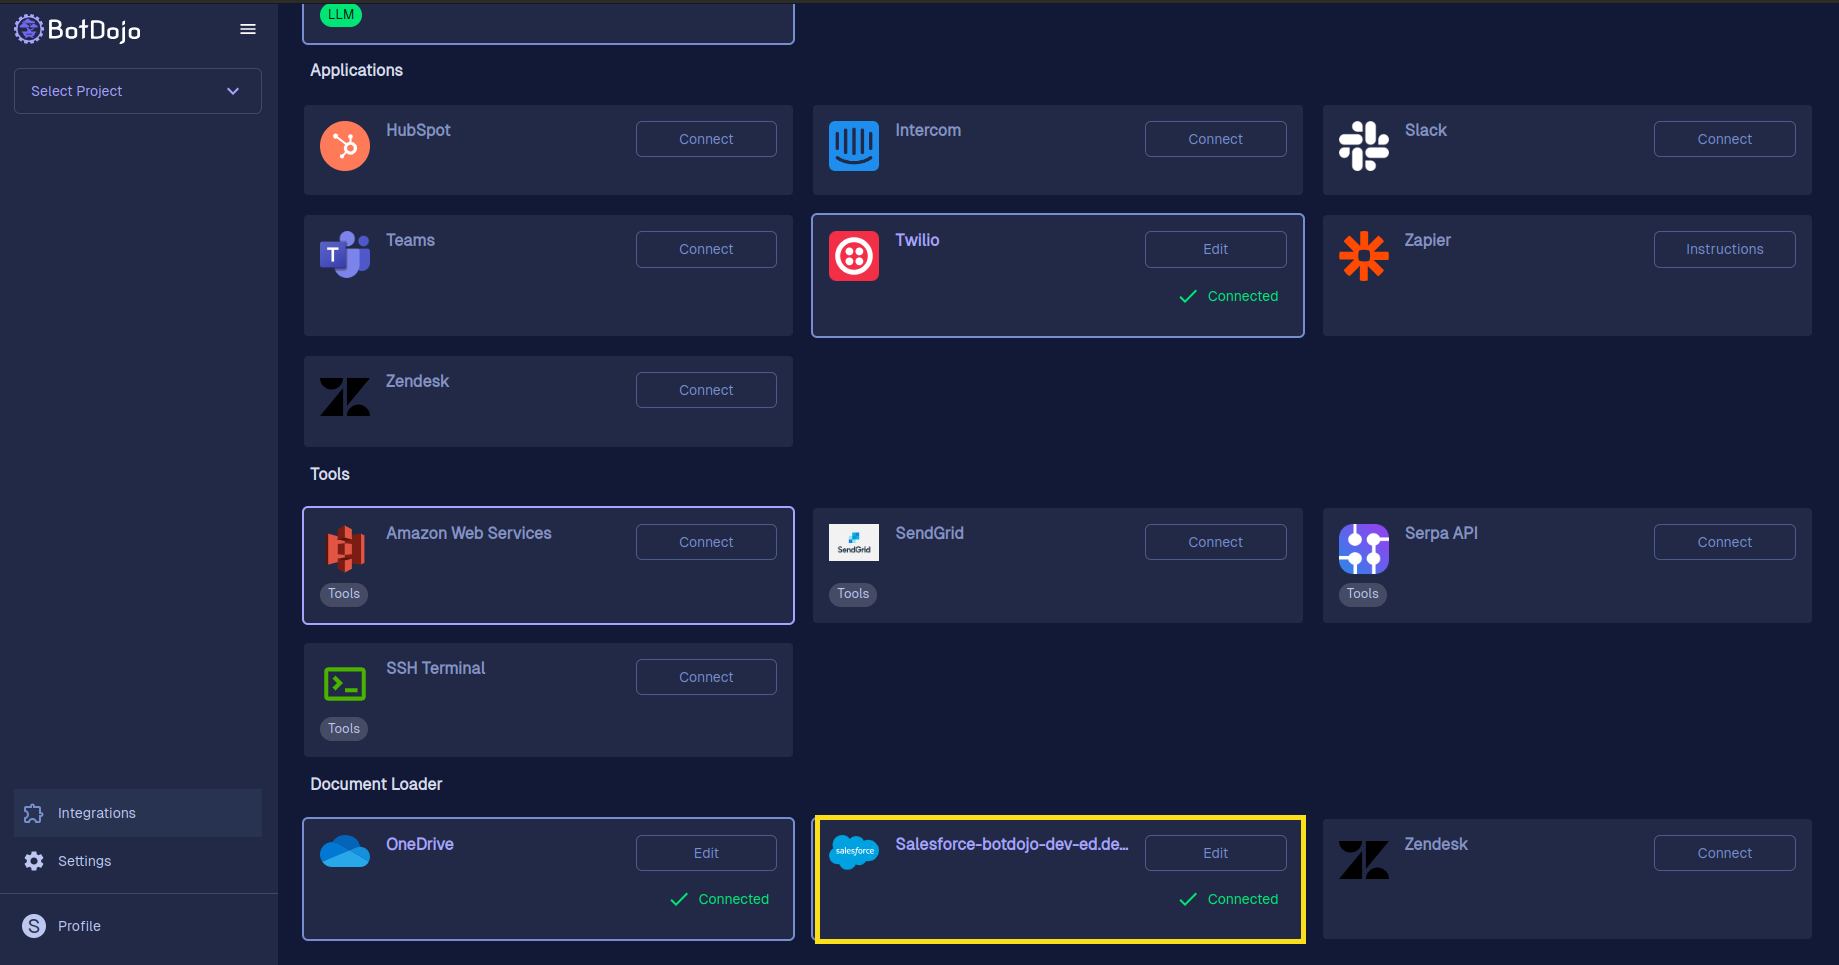
- On the left sidebar panel, click on the Integrations option.
Documentation screenshot
Step 2: Connect Salesforce Integration
-
Initiate Salesforce Connection
-
In the Integrations page, locate the Salesforce integration.
-
Click on the Connect button associated with Salesforce.
Documentation screenshot -
-
Enter Salesforce Credentials
- A Salesforce Integration dialog box will appear.
- Paste your previously copied Consumer Key and Consumer Secret in place of Client ID and Client Secret respectively.
- Enter your Salesforce Domain (the portion of the URL of your Salesforce instance).
- Click the Connect button to establish the connection.
Documentation screenshot
Now you have successfully connected Salesforce with your BotDojo account.
Build Custom Salesforce Tools
A project administrator can turn a Salesforce connection into a narrow agent action with a custom connection tool. Tool code uses Salesforce's documented REST resources, while BotDojo supplies the connected instance URL and authentication.
The runtime agent sees only the published tool name, description, and input
schema. It cannot see the tool source, Salesforce credentials, or the bound
connection.http.request(...) client.
Read Custom Connection Tools for the complete authoring, publishing, permission, and security model.
Use Salesforce REST Documentation
Build the request from Salesforce REST API resources:
- use the documented HTTP method;
- provide a relative, versioned path under
/services/data/; - put URL parameters in
query; and - put JSON request data in
body.
Do not include the Salesforce hostname or Authorization header. BotDojo binds
both to the selected Salesforce connection and rejects attempts to override
them.
The Salesforce request client supports GET, POST, PATCH, PUT, and
DELETE. Optional request headers are limited to If-Match, If-None-Match,
If-Modified-Since, If-Unmodified-Since, Sforce-Call-Options, and
Sforce-Query-Options.
Each tool invocation can make at most 10 Salesforce requests and run for at most 60 seconds. Each Salesforce request has a 30-second timeout. Individual responses are limited to 1 MB, and the cumulative response budget is 2 MB per tool invocation.
Example: Look Up An Account
The Salesforce starter creates a read-only Account lookup. Replace the API version if your Salesforce organization requires another supported version.
const tool = defineConnectionTool({
	name: "get_salesforce_account",
	description: "Look up a Salesforce Account by its record ID.",
	inputSchema: {
		type: "object",
		properties: {
			accountId: {
				type: "string",
				description: "15- or 18-character Salesforce Account ID.",
				pattern: "^[A-Za-z0-9]{15}(?:[A-Za-z0-9]{3})?$",
			},
		},
		required: ["accountId"],
		additionalProperties: false,
	},
	handler: async (input, { connection }) => {
		const response = await connection.http.request({
			method: "GET",
			path: "/services/data/v63.0/sobjects/Account/" + input.accountId,
			params: { fields: "Id,Name" },
		});

		return { account: response.data };
	},
});
Example: Add A Case Comment
This write action lets the agent choose only the Case ID and comment. The Salesforce object, method, and fields remain fixed in administrator-authored code.
Start with a Salesforce sandbox and keep the tool set to Ask while testing.
const tool = defineConnectionTool({
	name: "add_case_comment",
	description: "Add a comment to a confirmed Salesforce Case.",
	inputSchema: {
		type: "object",
		properties: {
			caseId: {
				type: "string",
				description: "15- or 18-character Salesforce Case ID.",
				pattern: "^[A-Za-z0-9]{15}(?:[A-Za-z0-9]{3})?$",
			},
			comment: {
				type: "string",
				description: "The comment to add to the Case.",
				maxLength: 500,
			},
		},
		required: ["caseId", "comment"],
		additionalProperties: false,
	},
	handler: async (input, { connection }) => {
		const response = await connection.http.request({
			method: "POST",
			path: "/services/data/v63.0/sobjects/CaseComment",
			body: {
				ParentId: input.caseId,
				CommentBody: input.comment,
			},
		});

		return {
			caseId: input.caseId,
			commentId: response.data.id,
			created: response.data.success,
		};
	},
});
Salesforce Troubleshooting
401or403: Confirm the connected Salesforce execution user is active and has API access.NOT_FOUNDorINVALID_TYPE: Confirm the object API name and record ID, including the namespace prefix for managed-package objects.INVALID_FIELD: Use Salesforce field API names rather than labels.- A write field is rejected: Confirm object permissions, field-level security, and whether the field is updateable. Formula fields are read-only.
- The request path is rejected by BotDojo: Use a relative
/services/data/...path without a hostname, query string, fragment, or path traversal segments. Put query parameters inquery. - The operation times out: Reduce the number or size of requests. A custom tool is intended for a focused online action, not a bulk export.
Using Salesforce in BotDojo Data Loaders
Once connected, you can use Salesforce data within your BotDojo account.
-
Navigate to Loaders
- Navigate to the Loaders section under Knowledge.
- Click on the Create Loader button
Documentation screenshot -
Create Salesforce Data Loader
- A dialog box will appear, Select Salesforce from the document source options.
Documentation screenshot -
Configure your Salesforce Data Loader
- A dialog box will appear. Select Salesforce from the options.
- Configure the Data Loader according to your need and fill in the required basic information:
- Name: Name for your Data Loader.
- SOQL Query:Your Salesforce SOQL that will fetch the documents from your Salesforce account.
- Keep Previous Records: This setting determines how document updates are handled:
- When checked: New records are added while existing records are preserved
- When unchecked: All existing records are replaced with the latest query results
- Destination Folder: Your BotDojo folder where you want your documents to be saved.
- Update Schedule: A dropdown that let you set a scheduler on your Data Loader for it to auto-run.
Documentation screenshot :::note Important After typing your SOQL, click on the "Test Query" button to verify if your query is correct or not. :::
Documentation screenshot Finally, Click on the Save button.
Conclusion
You have connected Salesforce with BotDojo. You can now load Salesforce data, use the built-in Salesforce actions, and publish narrow custom tools for the Salesforce REST operations your agents need.